
SRAMCharger
The manufacturer of Indus GT disc drive, shortly before ending its production, offered Indus RamCharger expansion card together with an adapted CP/M system. The system used the drive's Z80 microprocessor. The card is very rare, so one can think of making a clone. There is no schematics of RamCharger, its photos show that the card was equipped with 64kB dynamic RAM and a PAL chip, which controlled the expansion. So, it seemed very hard to make a copy of the card. Fortunately, the images of the Indus CP/M system diskettes still exist (although corrupted), there is also schematics of the Indus drive available. Making a deeper analysis, one can figure out, that the memory management concept, as well as the hardware solutions which already exist in the drive allow adding the additional 64kB of memory in much simpler way than doing an exact copy of the RamCharger.
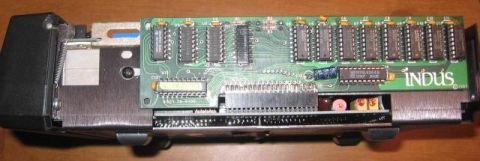 Indus GT drive equipped with RamCharger (photo by JR> of AtariAge)
In the late 80s, LDW company (Logical Design Works) obtained rights for manufacturing a clone of the Indus GT. The drive was called LDW Super 2000 and became very popular in Poland (where it was mostly targeted). The differences between LDW and Indus are: the power circuit and Roctec's mechanism (instead of Tandon's). The rest of the electronics is the same. Although the layout of the PCB has been rearranged, the key elements for our memory extension are still there. The same applies to the CA-2001 disk drive, a later model manufactured by LDW/California Access, although in this case a small fix is to be done.
The following extension applies to Indus GT, LDW Super 2000 and CA-2001. Instead of dynamic RAM we will use static one (so SRAMCharger ;)). In case of an add-on extension card, the functioning of the drive itself is not going to be altered. There must be original firmware in the drive (version 1.20 of the ROM is required for Indus GT). Additionally, thanks to the expanded RAM, Super Synchromesh software provides track buffering.
How to get the complete extension
AtariAge user TF_HH offers ready-made, compact sized SRAMCharger extension board, more info here. It can be prepared for Indus GT disk drive, LDW Super 2000, CA2001. In case of the two latter drives you should use an extension with a straight (not angle) connector and prepare the motherboard as described below.
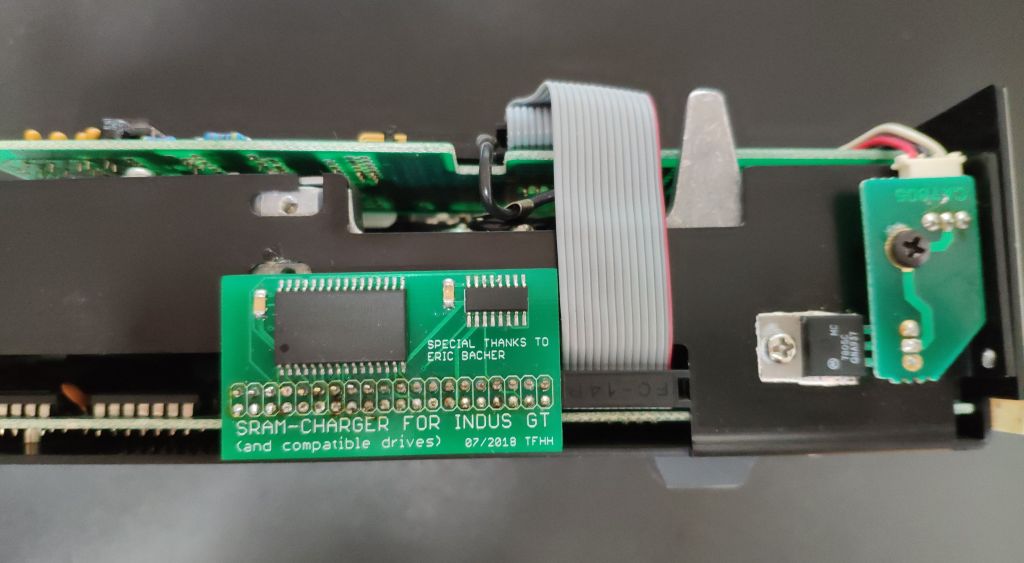 SRAMCharger extension from TF_HH inside the CA-2001 drive
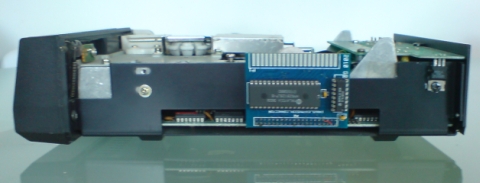 Another SRAMCharger extension (from tregare) inside a drive
How to build the SRAMCharger yourself
The additional 64kB of static memory should be managed in the following way:
-
32kB statically mapped into the area $8000-$FFFF
-
32kB banked by the /BANK signal from the drive into the area $0000-$7FFF.
Disabling of RAM and other drive chips, when the lower half of additional memory is active will be handled by the existing drive logic, but our extension should turn off the ROM with /ROMDIS signal additionally.
Signal names /BANK, /ROMDIS come from the Indus GT schematics. All needed signals are available at J3 connector, so it is possible to build the extension as an external module inserted into this connector.
SRAMCharger with two 62256 SRAM chips
The memory extension can be achieved in a few ways. With this version, you need:
- 2x 62256 SRAM chips
- 74LS139 (or similar).
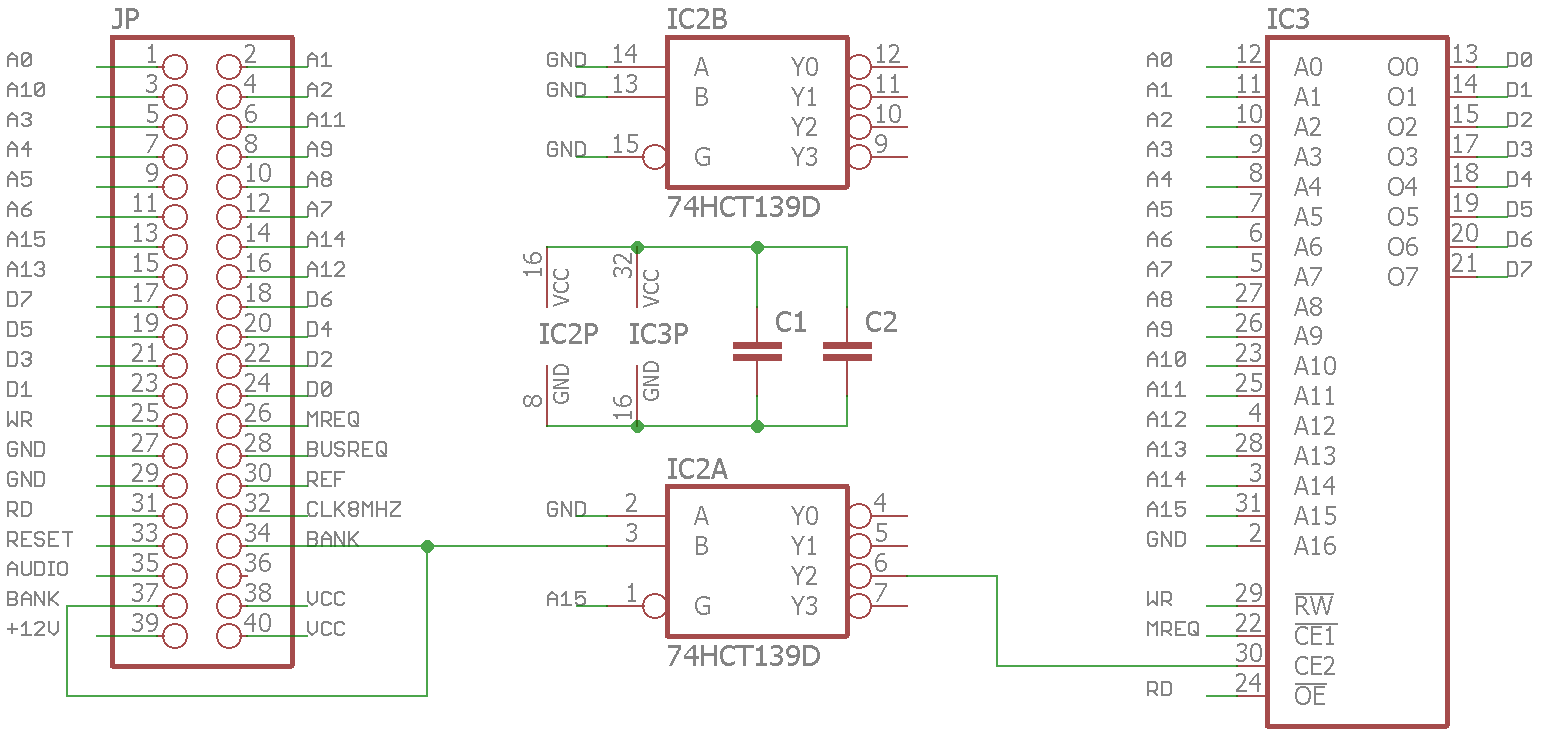
The extension should be build according to the following schematics:

Schematics of the extension using two 62256 chips
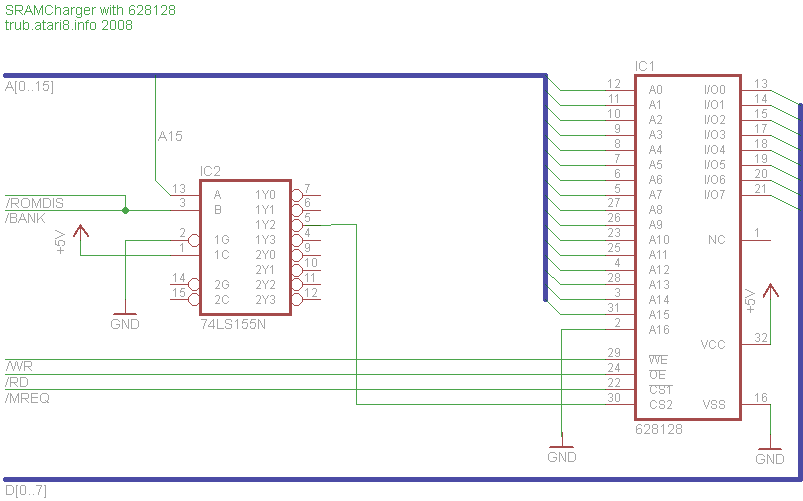
SRAMCharger with one 628128 SRAM chip
The SRAMCharger can also be build around a single 128kB SRAM chip. In this case you will need:
- 1 628128 SRAM chip (or similar 128x8)
- 74LS139 or 74LS155.
Some have reported that chips with access times of 70ns and slower work well. However, there may be problems with faster chips (55ns).
The schematics are given below:
 Schematics of the extension using one 628128 chip and 74LS139 (thanks TF_HH!)
 Schematics of the extension using one 628128 chip and 74LS155
Mounting into the drive
Indus GT
Check if your Indus is equipped with 1.20 version of firmware (most common). You can use my CP/M TOOL for this purpose. If not, you should update it anyway.
For Indus GT that's all, just plug the extension card into J3.
However, in some drives the J3 connector is missing (although this is very rare). If this is your case, you have to solder in a pin connector (the straight one, while LDW and CA use the angle connector).
LDW Super 2000
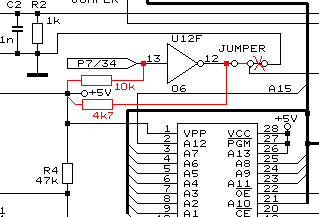
As mentioned, the schematics of this drive is very similar to the Indus GT's one. The banking logic is already present. However, since the /ROMDIS signal is disconnected by default, we need to reconnect it by inserting the missing resistors: R57 10k and R48 4k7 (there is a place for them on the PCB) and join/cut jumpers J2, J3 accordingly.
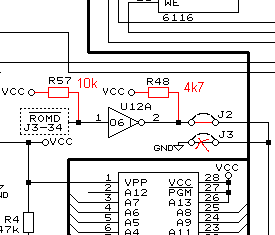 Part of LDW schematics - reconnecting /ROMDIS |
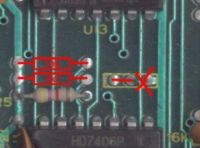
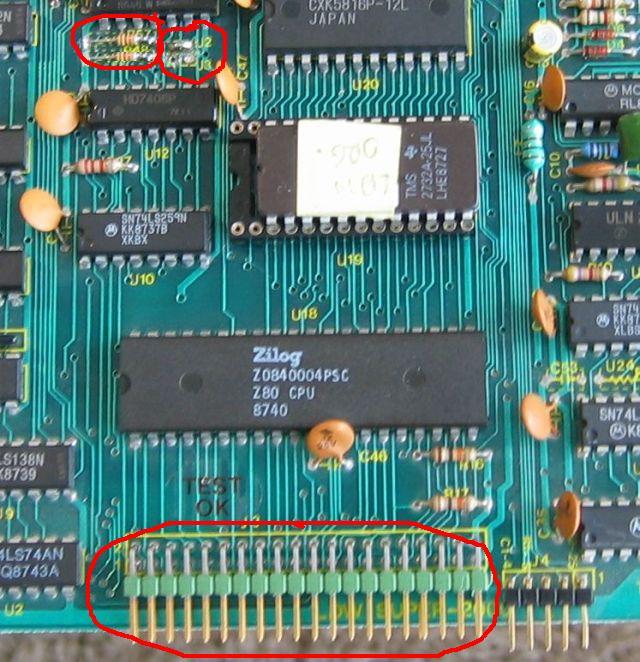 PCB of LDW with marked changes |
The LDW has a placeholder for the connector J3, so we can solder in an appropriate one if we are building an add-on card. I have used two-row angle male connector. With a suitable female connector, the card fits well under the drive's cover (like the original RamCharger).
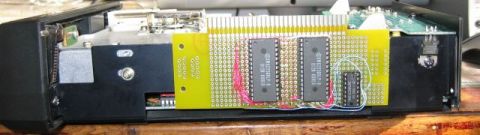
SRAMCharger prototype inside the LDW
CA-2001
More work is required in this case. There are different PCBs for this drive, what makes things even more complicated. First you should do similar changes as with the LDW. There is a jumper in CA-2001 which allows reconnecting /ROMDIS signal, you should also solder in two missing resistors: 10k and 4k7.
 Part of CA-2001 schematics - reconnecting /ROMDIS |
 PCB of CA with marked changes for /ROMDIS |
PCB CA-2000-D
In Indus/LDW, pin 4 of 74LS138 (U9) chip is connected to A15, but in CA-2001 it is grounded (through a jumper), what disables memory banking. The jumper is located near P7 connector (equivalent of J3) on the element side, and it is connected with pin 36 of P7. You should break the jumper connection and connect (from the soldering side) pin 36 with pin 13 to get the missing A15.
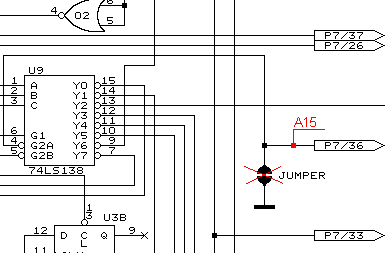
Part of CA-2001 schematics - fixing memory banking
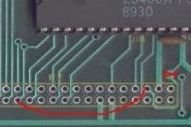
CA-2000-D PCB with marked changes for banking
PCB CA-2000-B
In this case pins 1 and 4 of P7 are shortened with a jumper and the wire which comes out of pin 4 is cut. This means that A0 signal is connected to pin 8 of 74244 (U6), but there is NO A2 at P7 so the extension will not work. You should solder out the jumper from the connector P7 and repair the broken track to pin 4. This will restore A2, however pin 8 of U6 74244 will be fed with A2 instead of A0. To fix this, cut the A2 connection to pin 8 of U6 and lead there A0 signal from pin 30 of Z80 CPU.Testing the extension with CP/M TOOL
Indus CP/M Tool can be used to test the SRAMCharger. The option RAMCharger check displays a firmware revision of the drive, checks for additional RAM and verifies the bank switching. The drive's display shows currently tested page of memory.
If the test succeeds, the message "RAMCharger: OK" is displayed. The drive is then ready to run Indus CP/M. If an error occurs, one of the following codes is displayed to help you identify the problem:
| Error code | Description |
|---|---|
| 1 | no upper extended RAM at $8000 (line A15 does not turn upper 32k RAM on) |
| 2 | extended RAM error at $8001 (data copy failed) |
| 3 | no lower extended RAM at $0000 (/BANK does not enable lower 32k RAM) |
| 4 | cannot restore ROM back at $0000 if /BANK not set |
| 5 | lower and upper 32k are the same |
| 6 | extended RAM found at $7800-$7FFF instead of drive's internal 2k RAM |
| 7 | lower 32k RAM test failed (memory error) |
| 8 | upper 32k RAM test failed (memory error) |
Thanks to jad, jer (Jerzy Sobola) and Zenon/Dial and sup8pdct for help with the page.